Glassdoor Job Analysis
Introduction
Building a data analysis pipeline often involves three tasks:
- Gathering the data
- Cleaning the data
- Modeling
This post is the first in a series intended to help get started building a data analysis pipeline from scratch. It starts with a basic overview of the abovementioned three-tasks process. Subsequent posts will explain in details concerns regarding optimization and model finetuning.
The example analysis we will be working with is to use job descriptions from Glassdoor to figure out the most popular skills/responsibilities at the moment.
Gathering the data
When you visit a website, what you see is HTML and CSS content rendered by your browser. In order to scrape the data, we need to automate website navigation and HTML parsing. If you’re not familiar with HTLM, you can find easy-to-understand tutorials at Mozilla Developer Network.
To simulate navigation through a website, we will use selenium package. Then we use bs4 package to parse a website’s loaded HTML content to find what we need. In this post we will use Firefox browser. Note that there are compatibility issues between selenium and FireFox versions. The following installation works for me:
- selenium 2.53.0:
pip install selenium==2.53.0 - Firefox 46.0: can be found at https://ftp.mozilla.org/pub/firefox/releases/
- geckodriver v0.9.0: download from https://github.com/mozilla/geckodriver/releases, move it to the same directory as your scraping program, and rename it to “wires”
A few notes regarding webscraping: you want to make sure that the website you’re scraping allows it. Read their User Policies. You don’t want to scrape a website illegally when it’s prohibited.
Now we can start. First we import the packages we need:
from selenium import webdriver
from bs4 import BeautifulSoup
import time
Next we fire up a Firefox browser:
driver = webdriver.Firefox()
After running the previous line, you should have a Firefox browser window in blank state. The next step is to navigate to glassdoor.com. To do this, we use the function get (from HTML GET request).
driver.get("http://www.glassdoor.com")
Now our browser should be showing the welcome page of glassdoor. What we want to do here is to enter a search term - I’ll use ‘data scientist’ here - in the job title search box, and location, e.g. ‘san francisco’, in the location search box, then click ‘Go’. To simulate these actions, we need to know how the above elements are identified in the html document.
To figure out these identifiers, we will use the Inspect feature of Firefox. Right click on the elements we want to identify, and the corresponding html should be highlighted in a window underneath. An example is shown below
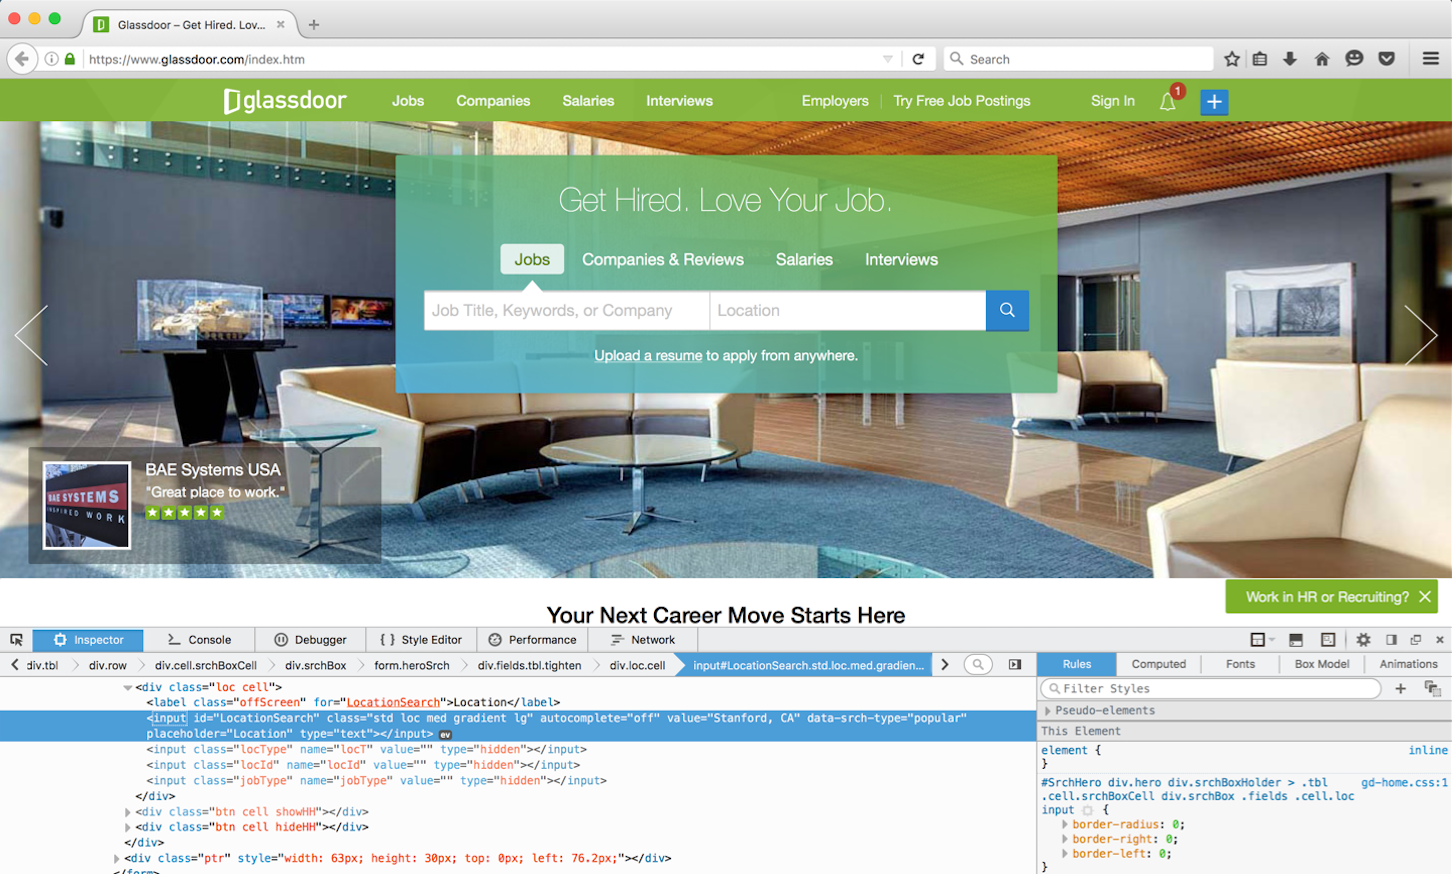
Doing this we see that the job title search box is identified by the id KeywordSearch, the location search box by the id LocationSearch, and the button ‘Go’ by class name gd-btn gd-btn-submit gd-btn-1 gd-btn-lg gd-btn-icon gradient. To simulate the action of entering text, we execute Javascript using the function execute_script, as shown below
driver.execute_script("document.getElementById('KeywordSearch').value = 'data scientist'")
driver.execute_script("document.getElementById('LocationSearch').value = 'Palo Alto'")
driver.execute_script("document.getElementsByClassName('gd-btn gd-btn-submit gd-btn-1 gd-btn-lg gd-btn-icon gradient')[0].click()")
The next step is to get the job description from every listing in the result. We’ll Inspect as we did with the search boxes, and find out that the listings are identified by the class name JobListing, and once you click on a listing, its job description is loaded on the right window, and the description itself is stored in a div element, identified by the class name jobDescriptionContent desc (with one space after desc).
Here’s how we are going to get the job description for every listing in a result page: - Get a list of the listing elements - Click through all of them, one at a time - Parse the resulted html, which will contain all the job descriptions that have been loaded
listings = driver.execute_script("return document.getElementsByClassName('jobListing')")

for listing in listings:
    listing.click()
    time.sleep(3)

jobdesc = BeautifulSoup(driver.page_source, 'html.parser').findAll('div', {'class':'jobDescriptionContent desc '})
Let’s check to see if we got the same number of descriptions as there were listings:
len(listings) == len(jobdesc)
True
Since the listings are listed in separate pages, we need to go through each result page and apply the same procedure we just did. Using Inspect, we see that the next arrow element at the bottom of the listing is a li element identified by class name next. We also know the number of pages there are, which is 268, so we can just click next 267 times, and we’re done.
We should group together in a function the commands we used to gather the job descriptions from listings in a single page. This makes our code cleaner.
def get_job_descriptions():

    listings_html = BeautifulSoup(driver.page_source, 'html.parser').findAll('li', {'class':'jobListing'})
    positions = [t.findAll('a', {'class':'jobLink'})[1].get_text() for t in listings_html]

    listings = driver.execute_script("return document.getElementsByClassName('jobListing')")
    for listing in listings:

        listing.click()
        time.sleep(3)

    jobdesc = BeautifulSoup(driver.page_source, 'html.parser').findAll('div', {'class':'jobDescriptionContent desc '})

    return positions, jobdesc
Now we can loop through the result pages and parse the job descriptions. We’ll gather the descriptions in a list - this will be our corpus.
This process of retrieving data is an I/O bound task and so, instead of performed in loops, can be sped up significantly using concurrency. I will cover this topic in future post, since it is not the focus of this post.
job_descriptions = []
positions = []
for i in range(267):
    pos, jobdesc = get_job_descriptions()
    job_descriptions += jobdesc
    positions += pos
    nextpage = driver.execute_script("return document.getElementsByClassName('next')")
    nextpage[0].click()
    time.sleep(5)
Cleaning the data
In each posting we are interested in the job’s requirements and skills. By inspection we see that these are usually listed with bullets (using html li tag) or ‘*’.
Since job_descriptions is a list of BeautifulSoup.Tag objects, to get such bulleted and starred text, we use findAll() function and regex facility (provided by re module). For each BeautifulSoup.Tag object, we will find all the li tags, then all the lines beginning with ‘*’. Note that the li tags are Tag objects as well, so to retrieve the raw text from them, we use get_text(). Finally we get rid of the new line characters ‘\n’ using replace() function.
import re
skill_req_descriptions = []

for job in job_descriptions:
    listed = job.findAll('li')#text=re.compile(r'Requirements|Qualifications'))
    starred = job.findAll(text=re.compile(r'^\s*\t*\*'))
    text = [tag.get_text().replace('\n', '') for tag in listed] + \
           [item.replace('\n', '') for item in starred]
    if len(text) > 0:
        skill_req_descriptions += text
Modeling
To model the most important skills from the corpus, we use Latent Dirichlet Allocation (LDA). There are other methods, such as TF-IDF, but LDA is the most popular topic modeling technique. The key idea is this: LDA assumes that each document in a corpora is composed of a number of topics. These topics generate words based on their probability distribution. From the corpora, LDA tries to figure out the topics that would generate the documents.
There’s a lot of online material that explains the mathematics behind LDA, so here I’ll demonstrate only the results.
We will use the gensim package for LDA. gensim has an easy to use API and also is designed to be fast and robust. To generate our LDA model, we first create a corpora from our clean documents. Then we create our document-term matrix, in which each entry corresponds to the frequency of a term (on a row) in a document (on a column). Note that this is a sparse matrix. Next we create an LdaModel, and finally we train the model on the document-term matrix.
Since we want the topics to be about skills, we use a low number of topics (10) to isolate the skills, instead of meta-topic about skills.
from nltk.corpus import stopwords
from nltk.stem.wordnet import WordNetLemmatizer
import string
stop = set(stopwords.words('english')).union(set(['data','science','analytics','experience','job']))
exclude = set(string.punctuation)
lemma = WordNetLemmatizer()
def clean(doc):
    stop_free = " ".join([i for i in doc.lower().split() if i not in stop])
    punc_free = ''.join(ch for ch in stop_free if ch not in exclude)
    normalized = " ".join(lemma.lemmatize(word) for word in punc_free.split())
    return normalized

clean_documents = [clean(doc).split() for doc in skill_req_descriptions]
import gensim
from gensim import corpora

dictionary = corpora.Dictionary(clean_documents)
document_term_matrix = [dictionary.doc2bow(doc) for doc in clean_documents]
lda = gensim.models.ldamodel.LdaModel

lda_model = lda(document_term_matrix, num_topics = 10, id2word = dictionary, passes = 50)
Once our model is ready, we can print out some of the topic compositions. Here we print 10 compositions, with 4 topics each.
pprint(lda_model.print_topics(num_topics = 10, num_words = 4))
[(0, u'0.020*system + 0.016*vision + 0.014*model + 0.014*knowledge'),
 (1, u'0.064*ability + 0.040*work + 0.027*environment + 0.016*change'),
 (2, u'0.021*technology + 0.015*highly + 0.014*big + 0.013*need'),
 (3, u'0.042*learning + 0.034*machine + 0.025*model + 0.024*analysis'),
 (4, u'0.042*degree + 0.040*computer + 0.037*science + 0.036*field'),
 (5, u'0.039*team + 0.035*product + 0.029*development + 0.022*work'),
 (6, u'0.053*year + 0.031*python + 0.028*sql + 0.027*language'),
 (7, u'0.029*business + 0.017*insight + 0.016*problem + 0.015*analysis'),
 (8, u'0.020*plus + 0.018*high + 0.014*test + 0.014*research'),
 (9, u'0.090*skill + 0.057*strong + 0.045*communication + 0.030*written')]
Some interesting pattern emerges. For example, python and sql tend to be listed together. Strong communication skill via writing is emphasized. And building machine learning model seems to be a popular requirement.
In the next post I’ll go over how to optimize of the tasks we did here, as well as finetuning our model. Stay tuned.